Wednesday, May 30, 2012

Writing Desk #3 and Class/Show Schedule

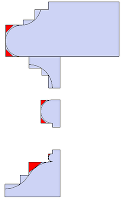
Let's take a quick look at the third writing desk from two weeks ago:


Dimensions

A rabbet at all transition points:


A rabbet (or two) for each concave portion: 


A snipes bill to separate two profiles and create a sharp quirk: 


A chamfer for each convex portion: 


Knocking off the corners with the appropriately sized hollows and rounds: 


e-complete


If you want to learn and try this and much more come see me at a show or class.

I will be teaching at Bob Van Dyke's Connecticut Valley School of Woodworking on July 7th and 8th.

I will be attending the Lie-Nielsen Open House in Warren, ME the next weekend on July 13th and 14th.

I will also be teaching a weekend workshop at Lie-Nielsen on August 18th and 19th.

And I will be teaching a weekend class with an optional 3rd day at Chuck Bender's 
Acanthus Workshop in September.

Thursday, May 24, 2012

Tuesday, May 22, 2012

A Woodpecker for Peter

What else would you be doing at 7am on the rainy morning of your seventh birthday?


Sheldon, in his anticipation of possibly seeing Peter Follansbee at the Lie-Nielsen Summer Open House in July, opted to practice a little more cleaving.

Thursday, May 17, 2012

Moulding Profiles of Writing Desk #2

Let us take a quick look at the second set of profiles from last week.

Dimensions:

Step 1:
 Make a rabbet at any transition point from flat to round or hollow.

 Step 2:
Make a rabbet to guide any round. Again, the arrises of the rabbet should approximate the angle of the finished profile. In this case they are at 45 degrees. (Why does this rabbet not fall upon the finished profile when Monday's did?)

Step 3:
Make a chamfer for each instance you will be using a hollow. The edges of the chamfer shall approximate the angle of the finished profile. 


Step 4:
Knock of the corners with the appropriately sized hollow or round. 

Complete:


If this is getting repetitive it's time to stop reading, buy a pair or two at a local garage sale, and make a picture frame to match the one in your living room. Then send a picture.

Wednesday, May 16, 2012

Four Holes Enter, Two Holes Leave: Making a 1/8" Mortise with a 1/8" Drill Bit

When teaching people that are making their first hollows and rounds, Larry Williams advocates using gimlet bits to start the mortise for side escapement planes. He demonstrates this on his video. He and Don McConnell have taught this to a countless number of students who have executed the method successfully.

Much to Larry's chagrin, I use a drill press.

There are several issues with drill presses and drill bits. The biggest of which is dealing with a drill bit that skates around the top of your angled plane billet before wandering through a seemingly random and inaccurate progression. These issues are exaggerated with the thinnest drill bits (i.e. 1/8")

So, how do you make a 1/8" mortise with drill bits that are 1/8"? Here's how I make the mortise for a #1. (Again, this is a supplement to Larry Williams' Lie-Nielsen produced DVD.)

I start by marking the top of the mortise. 

Mark the angle that the wedge will ultimately lean on the back of your stock. This line is drawn from the blind side of the top of the mortise to the blind side of the mouth.


 Using a hand drill and drill bit that is 3/32" I make a pilot hole in the center of the marked mortise. (Use a nail set, awl, etc. if you are initially uncomfortable with making slight adjustments.) 

Go ahead and make three more.

 Once you are comfortable that the holes are centered in the mortise change the drill bit to 1/8". Widen the holes while approximating the angle.
These pilot holes, which are now 1/8", will prevent the thin bit from skipping around on the top of the plane billet when starting the holes. 

Then it's on the the drill press.


This is our final goal from the drill press. There are four holes up top. Usually you will only get 2 or 3 on the bottom.


I take the time to make four holes because the mortise chisel is then two strikes of a mallet away from being through.


The result:

I was off by 1/128".


Any time I use the 1/8" bit I make more than two holes. I make four for the 1s and 2s because the mortise is only 1/8". I make three pilot holes with 3-6. With those planes, after the drill press, I use a 9/64" or 5/32" bit in my hand drill to widen the holes.

The process seems like there are a ton of steps. The whole process--from starting the pilot holes to walking away from the drill press--will take me 5-7 minutes for a pair of planes.

Additionally, I only make these pilot holes when using a 1/8" bit. I always, always, always mark the angle of the leaning wedge on the back of the billet to make certain the jig is correctly aligned. It's quick.


Tuesday, May 15, 2012

Moulding Profiles of Writing Table 1

Last week we took a brief look at the moulding profiles of three different writing desks. You were assigned the task of considering the execution.

The first set of profiles is e-executed using the following steps and ePlanes

Dimensions


Step 1:
A rabbet defines all fillets and transition points from concave to convex, convex to concave, vertical fillet to concave, etc. 


Step 2: A rabbet is added to guide each of your eRounds. (Note that in the following instances the vertex of the rabbet nearly falls upon the finished profile. This facet will serve as a depth gauge. The arrises of the rabbet approximates the angle of the finished profile.)


Step 3: A chamfer is made to guide each of your eHollows. (Take note that the chamfers approximate the angle of the finished profile. Additionally, there are times when the chamfer does and does not touch the finished profile. Is this intentional? If so, Why?)


Step 4: Knock of the corners with the appropriately sized hollows and rounds. If you don't have the a plane with the perfect radius use your closest undersized round and oversized hollow.


Complete:

I should also note that I am not suggesting that these profiles were historically executed in this fashion. 

I'm simply showing you an option to produce tons of profiles with the same set of tools.


Thursday, May 10, 2012

Moulding Profiles from Three Writing Tables

Homework time!

Take a look at the three sets of profiles below.


Think about what planes you will use. Where do the rabbets that guide the rounds belong? What about the chamfers for the hollows?

Stay tuned! The answers are coming.

These profiles are from Mid-18th century writing tables. Which do you like best? With hollows and rounds you have the option, along with hundreds of others.


Note: If this is your first time at this site, or if you've only started reading, I recommend that you start at the beginning of the blog back in Dec 2010. 

Tuesday, May 8, 2012

Making a Rabbet Plane

I'm very partial to rabbet planes. They're easy to use and extremely versatile. Let this be a supplement to Larry Williams' Making Traditional Side Escapement Planes. Refer to this video if you have questions regarding the tools used, flattening the bed, heat treating the iron, etc.

If you have questions regarding how to use the plane check this link out.

The mortise for this plane is a little harder to make than side escapement planes since it is fully visible on both ends. There are more contact points the wedge must touch. Flattening the bed is also more tricky (at least for me).

After laying out the shape, saw the escapement and drill two holes to start the mortise. 

Using floats, I work on a single side of the mortise first. This thinner wedge should mate flush at the top and bottom with no high spots in between.  I use dial calipers to ensure that the mortise is vertical by comparing the top to the bottom.

Fit the wedge. Since you know that one side of the mortise is already correct, all of the work here will be done on the opposite side. (Note: I follow this same process with side escapement planes. I work to completion on the blind side first and fit the wedge by exclusively working on the escapement side.)

I make the mortise and fit the wedge at this stage. Fitting the wedge to the front of the mortise now is much cleaner than if you were to start working on the escapement. I won't have to worry about blowout at the bottom. 


Working from both sides towards the middle, I use a forstner bit to bore a 1" hole straight through.

Roughly cut out the escapement at the bottom of the mortise and top of the mouth. This allows the wedge, once fit to the mortise and iron, to make contact in the mortise the way that it ultimately will.

Cut the wear angle for the iron and fit the wedge to the iron.

Flatten the the bed.

I often get asked what tools I use for the escapement. I wish I had a great answer. 
I carve it.


and sand it.

You can take it from here, right? If not, check out Larry's dvds.


Friday, May 4, 2012

Moving On: Not a Textbook Example for Hollows and Rounds

My biggest regret in making the lowboy I recently completed was posting pictures here. It allowed me to know exactly how long I worked on it. It was demoralizing.

Well, I've started the next project and here I go again.
Technically, this isn't my next project. I have some actual stuff around the house that isn't insignificant. And a bed is what I really want/need. But doing this in pieces will allow me to convince myself and Mr. Marsh that I did it over a few months.

It's part of a birdcage for a tea table.

For this project I won't actually use any of the planes I make. The moulding will be carved.

Thinking: I guess that I may be able to make the case that, in choosing what I will do next, I can consider anything and am still not being limited by my tools, thus having hollows and rounds still affects. But I did need to do this at a friend's shop because I don't have a lathe. I also had an acquaintance come to my shop last week to use my tools. Maybe woodworking friends are more important than tool choice?

Thursday, May 3, 2012

Part IV: I Said...This is a Textbook Example for Hollows and Rounds

Over the last few days I have detailed several moulding profiles for a tall case clock that an acquaintance is copying of a clock made by his great great grandfather.

Today we will take a quick look at the final profile we made. This profile is subtly different than the profile we made yesterday. (Who knows, the original intention may have been for the same profile.)


Snipes bill followed by rabbet.


#4 round followed by #8 round


#2 hollow

Take note the the entire profile is lower than the original surface. This was not the case yesterday. 

Additionally, the bead is closer to that back fillet here than yesterday's astragal. (note: Yesterday's bead was technically an astragal because it was raised from the surrounding flat surfaces. We have a sharp quirk on the back side here, not a flat.) 

Finally, today's cove is much more elliptical than yesterday's, which was more of a circle segment. How do I know this? When it comes to copying a piece, just hold your planes up to the moulding you're copying (with the iron out). You'll easily be able to see if a cove is cut with an 8, 4 or both, depending upon how the plane matches the profile.


Bill and I did not address the hood's crown along the top because he had not yet decided how he will cut the arch, which was originally carved.