Sunday, July 30, 2017

Custom Crown Moulding By Hand

In my previous post I illustrated the execution of a few simple profiles: one concave, convex and flat surface. These modest profiles illustrate the necessary series of steps for guiding hollow and round planes, which have neither fence nor depth stop and are seemingly difficult to steer. Know that hollows and rounds are always guided in the same fashion I presented there, even when making something more intricate.

The process can seem daunting with more complex profiles. A sober mind will soon conclude that the same process, once learned, understood and tried will apply there, here and everywhere.
Hollows will ride the edges of a chamfer to create a convex surface and rounds will ride the edges of a rabbet(s) to make concave faces. Combining these attributes to guide various hollows and rounds will allow you, the end user, to make increasingly complex profiles.


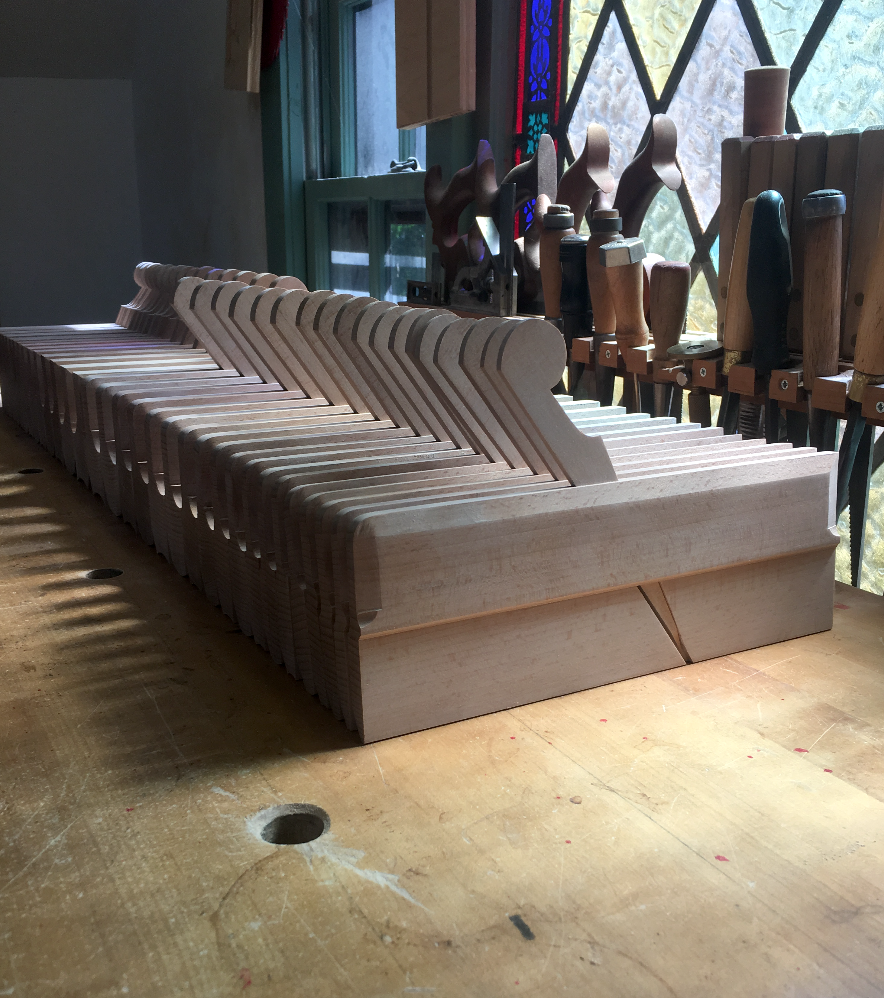
See if you recognize any portion of the process with the following moulding from E. J. Warne’s Furniture Moulding.

When preparing to make this moulding we must first transfer the profile from paper onto wood. Step 1 is “find the flats” of the profile.


From here, having already used a circle template to find the various radii of the circle segments involved, connect the flat surfaces and then add an appropriate series of rabbets for every round to be used.


Once defined, transfer the rabbets to the ends of the final piece and knock off the bulk of the material with your favorite method. If this is a big leap, see here.

All of these rabbets must first be defined with a rabbet plane or other preferred method. See how I did this here.


Start knocking off the edges of those rabbets with the appropriately sized rounds. I used #14 round first.

The round has no fence and no depth stop which, again, is an absolute advantage of the tool. These planes will ride in the rabbets which serve three purposes: removing the bulk of material with an edge that is easiest to maintain, creating a series of chutes for the planes to ride in that substitute for a fence, and giving the user a defined goal that will be a depth gauge.

Add a chamfer for the #10 hollow.

 The chamfer for the #10 will serve the same three purposes as the series of rabbets did for the #14.

#6 round is next, guided by rabbets

Finally, chamfers to guide the #4 hollow

All that is left is a poor miter, a drink,

and a reiteration that the process of steering these planes is easy because it is always the same.


Thursday, July 20, 2017

How To Use Hollows and Rounds: Steps 1

Hollows and rounds have no fence and no depth stop. The lack of these two features is what allows for their flexibility. No fence and no depth stop means that there is no predetermined angle, location or orientation that each plane must be held. With no fence and no depth stop the idea of infinity is introduced.


Hollows and rounds are extremely versatile and seemingly very difficult to steer. If you hold the concave edge of hollow upon a square corner you will be able to make a convex surface.


The likelihood of the beginning equaling the middle, equaling the end, and equaling what you want is slim to none.

Balancing a hollow on a square corner is possible. Now try it with a round. (I will recommend backing the iron off into the plane body. You'll see why.)

Again, hollows and rounds have neither a fence nor a depth stop and that's good. We just need a way to steer these tools.

In the last few posts I fired through laying out a complex profile and then quickly rifled through the creation of what I laid out. You certainly noticed that these two blog posts focused on rabbets with no mention of actually using profiled planes. Rabbets and chamfers dictate the final result and are the key to all of the above obstacles.

Rabbets and chamfers will serve as a fence. Rabbets and chamfers will serve as a depth gauge. Additionally, rabbets and chamfers will remove the bulk of material with an edge that is easier to maintain.

Balancing the convex sole of a round on a single, square point is nearly impossible. Adding a rabbet will give the plane two points upon which to register instead of just one. The rabbet will act as a chute for the plane to ride in and will thus serve as a fence.
Note that the vertex of the rabbet (the inside corner) nearly falls upon the finished profile. This vertex, along with the surrounding vertical and horizontal surfaces, is your depth gauge. If a rabbet is uniform then you shall make it regress uniformly as you progress into your profile.

Let us quickly move to the hollow. We must give this plane two points to register upon in the same fashion we did with the rabbet for the round. Here we are going to add a chamfer.
The plane will register upon the outside edges of the chamfer. Changing the angle of this chamfer will change the angle at which the plane is presented into the wood, which will change your final profile.

The bulk of the steering and manipulation of these tools is done with rabbets and chamfers. Every time you use a hollow start with a chamfer. Every time that you use a round start with a rabbet.

This looks easy, right? Now try it with the appropriately sized planes to make the framing in the previous bedstead illustrated in E. J. Warne's Furniture Mouldings.
We will be using a #2 hollow and round, which cut a radius of 2/16". Good luck!


These tiny profiles are not the easiest place to start. Of course, we didn't start here so go back and read some old posts if you are interested. 


Creating Basic Shapes With A #6 Hollow


All profiles are a series of convex, concave and flat surfaces. Hollows and rounds create exactly this. These profiles are made with the same basic series of steps. You just need to learn the steps. 1, 2, 3...

              
When you learn the steps with appropriately functioning tools you will be able to decorate your furniture in the manner you see fit, never relying upon either your limited selection of router bits or Woodcraft's. You will never have to let these selections determine your next project or how it appears in low light or with poor photography.
Of course, if you have the shaper knives for one of the profiles above and don't see the difference between the two, that's also fine. Keep making things.

In just a few more posts I will convince you to buy my book or DVD.


Monday, July 17, 2017

Making Moulding By Hand: eBedstead Part II

There are two distinct sets of woodworkers that I tend to disappoint. One of these groups is the Hand Tool Only crowd. I guess it is often assumed that since I make and sell moulding planes (www.msbickford.com) then I must be a hand tool-only guy. I am not.

I became aware of hollows and rounds as a means to an end: the ability to create an infinite number of options. I was attracted first to the ability to make what I may want, unbridled from my selection of router bits or Woodcraft's.

This beadstead that I am highlighting hopefully illustrates this idea.


I do not intend to make this piece. However, I am no longer limited by my tooling to make it exactly if I choose. By introducing hollows and rounds into my work I possess the option to make small or large changes. These changes will be those that I may want to make, never being forced into a close interpretation or being good enough.

Hollows, rounds and the accompanying few planes offer you, the end-user, infinity. They offer you choice and they offer speed for short lengths. They never inspired me, however, to get rid of my machinery because machines can speed up the process.

Last we left this moulding we had transferred the layout lines onto our block of wood.

From here I move to machines. First, the bandsaw:

The next step is to create a series of rabbets. As discussed previously on this blog, rabbets serve three purposes: removing the bulk of material with the edge that easiest to maintain, creating a series of chutes for the plane to ride in while serving as a substitute for a fence, and creating a series of depth gauges. (More on these in the past and in the future.)

I added most of my rabbets with a tablesaw. In this case I added the large chamfer on the bandsaw at 45 degrees, so I tipped my tablesaw blade over to 45.

I don't spend time being too perfect here. I just get it really close and then clean it up with a rabbet plane. 

Making these rabbets with a snipes bill and rabbet plane is, of course, a straight forward process for you idealistic hand tool only guys. Lord nows I've made plenty myself. I just prefer the tablesaw here. 

(Note: if you rely upon the fence and depth stop of a moving fillester or other similar plane than you will not be able to make this series of rabbets. You will eventually lose the surfaces upon which the fence and/or depth stop register.)


We have yet to use a profile plane, but we are nearly done. Getting to the above product I often estimate as being 70-80% or the work. 


Do you see? It's that quick

It's done!


Again, the final product:

The final resting place: 


And a hint at the options and final solutions for you Hand Tool Never guys:


Enjoy sacrificing, sanding and/or waiting weeks for delivery!

Friday, July 14, 2017

Poplar eBedstead Circa 1710


Have you ever looked at a potential piece, considered the build and then simply disregarded the project due to an inability to make one certain aspect?

Before I became aware of hollows and rounds I did this quite often. Moulding profiles dictated my choices. The range of options is limitless.

Consider this bedstead...

(It will really tie your bedroom together like no rug can.)

I imagine that this piece is not currently on the 'to do' list for many of us. But can you make it? We could all figure out the turnings, joints, panels, etc. But the mouldings...

(Warne, E. J. Furniture Mouldings. Other bibliographical information...)

It would be sad to let only the mouldings preclude you from making this. It would also be a shame to purchase the specific shaper knives and router bits only to never use them again. (Not to mention the sanding)

With hollows and rounds you can make all of these profiles and, with the same series of tools, create the next.

Let me quickly walk you through the process of making the crown. If you have neither followed my blog before (start from the beginning) nor read my book then the following will appear convoluted. Read the blog posts from the past or stick with me in the future. It will ultimately make sense.

The first step in making this exact crown (above, center) is to transfer the shape from paper onto wood. I do this accurately by first "finding the flats." Define each vertical and horizontal surface by measuring from known edges.
(Once I have the thickness and width, I can use my dividers. Do you see the tool marks on the edges?)

Then, using a circle template, I choose the correct radius and connect the flats.

This first cove was made with a 4/16" and 6/16" concave radius that equates to a #4 and #6 round, respectively. This elliptical shape is more complex than the following and we will touch upon it further at a later date. (There is another post about elliptical/ovular shapes buried in this blog somewhere, but I can't find it now.)

This next convex shape was made with a #6 hollow and is a 6/16" radius. It is 90 degrees of a circle. It's a straight forward operation but not the easiest, just close. On a scale from 1-10 it's a 2. We will (and have) cover(ed) this, too.

Step 3 in laying out the curves? The ogee.


Okay, we have the final shape but hollows and rounds have no fence and no depth stop. The lack of these two features is an absolute advantage of the tool and what grants them their flexibility. We just need a series of rabbets and chamfers to guide these planes that are difficult to steer..  


Why are we drawing the moulding profile in this fashion on the upper left corner of a piece of wood? Easy!


Drawing the profile in this manner allows for a simple transfer of gauge lines. 


The rabbets pretty much define the final profile. Making rabbets accurately should be a straight forward process. So be certain to save this layout piece if there is any chance you'll make the profile again.

Feel free to redraw your actual profile by connecting the flats again.

Come back later...