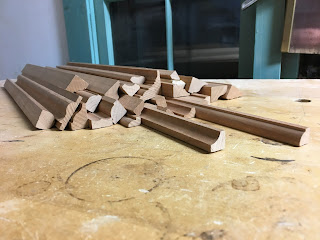
Monday, January 22, 2018

Side Rounds: A Serial Instructional, Part II

Part I of this Side Round serial may be found here.


When addressing the idea of side rounds the immediate question is often: "Does one need a series of side rounds in the same manner that one needs a series of rounds?"


The answer to this question is "No."


There are, of course, many different arcs and radii that may be included in a final moulding profile. Individual hollows and rounds are used to cut those same arcs and radii. Therefore, many rounds may be ideal.

Though hollows and rounds are used to make a specific circumference, they should not be used to set that same arc of a circle down, into wood.


The shape of the rounds' body will preclude it from reaching into the absolute corner.


These instances are where the side rounds comes into play. The side round will establish the transition point where this particular profile changes from convex to concave. 

The side round often only creates clearance for the appropriately sized round while establishing that transition point.
As such, a comprehensive series of side rounds is not necessary because the profile they create is not often included in the final profile, only the transition point and clearance they create is.

I make two sizes of side rounds as standard:


These side rounds may be used for creating clearance for a wide range of rounds.


Further information may, of course, be found here.


Thursday, January 18, 2018

Rule Joint Planes, Etc.

MERCY!!! I was trying to talk about side rounds here, but...

Throughout the many years I’ve been making/selling planes I have seen several common requests go in and out of fashion. Some months I get numerous requests for moving fillesters. On other occasions my time is spent responding to the wave of those that suddenly want tongue and grooves, 3/8” side beads, panel raisers, skewed rabbets, etc. 

These past few weeks I have been responding to a significant number of people interested in a pair of Rule Joint Planes. The number has been so significant, in fact, that I am here, writing this blog, in comprehensive response. (I will, of course, add it to my FAQ page, too.)


For those of you that happen to stumble upon this blog post and do not know what a rule joint is, that’s ok. You may, after all, only know it as the integral joint of a drop leaf table. You may even have a few in your living room. Your grandmother’s favorite piece of furniture may have showcased it, like that of my own...


The joint allows a table to be extended easily while decorating the seam with a common moulding profile: a square ovolo with fillets.


A rule joint is comprised of two sides. The primary side is the top, which is a square ovolo with fillet that is ideally more than 90 degrees of a circle. 

The second half is a square cove, ideally with a slight flat at the bottom.

All of this allows the joint to be opened and closed seamlessly, without seeing any voids.


At first glance you may conclude that these profiles are easily executed with simple dedicated planes because they are simple, specific profiles. To some degree you are correct, each portion could be made with these planes.


The issue with this process is getting the two profiles to align perfectly because the depth stops of common dedicated planes will register upon different faces of the table's top.


This is fine if the thickness of the pieces being worked is exactly the width for which the planes were designed: no more, no less.


This fact is, however, an issue once any slight change in stock is worked.
 The slight change will result in a joint that does not align.


The profiles above do not match. In fact, any material that isn't exactly thicknessed for the planes' design will not match. Thus, common, sprung, dedicated planes will not work for this joint.

"But Matt," you say, "there are historical examples of rule joint planes. Why not this?"

Let us take a closer look at rule joint planes while acknowledging the one truth I've illustrated above: the two planes must register upon the same face. 

The fences of the dedicated rule joint planes must register upon the underside...

(in the scenario above the plane on the left has no depth stop, which is a MAJOR issue)

or the top 


This final illustration would be my choice, but there are still more issues involved. Due to the need for the planes to register upon the top of the piece, both planes cannot be sprung. This means that the scraping action of the cutting edge is greatly increased. This greatly reduces the edge's longevity. See here and here for further information on this subject because there are even more issues regarding seasonal maintenance and difficulty sharpening (not just increased amount of sharpening.)

I guess what I'm saying is the following:

Rule joints and rule joint planes are perfect examples of where hollows and rounds excel. I wrote a blog post on the actual steps years ago. It can be found here.


A rule joint is a perfect place to begin for somebody interested in introducing hollows and rounds into their work. The two portions of this joint are elementary and may be perfected in two or three attempts. In fact, I teach classes on using these planes and the two profiles included in the rule joint are only the third and fourth in a weekend spent using profiled planes excessively.

 Be done with the joint before lunch:

If you're running ahead of the group then do it better:

Make a rule joint with hollows and rounds knowing the whole time that these two profiles are only a portion of what may be done with a single pair.

In short, I don't make rule joint planes because I don't want my name on the nonfunctioning tools in your workshop. Make the joint with hollows and rounds and then use the same tools to do much more.

Tuesday, January 16, 2018

What Are Side Rounds and How Do They Work? Part 1

Approximately once a month I will be featuring a specific plane. I will post several pictures of the plane on my Instagram account (@msbickford) over the course of several days. A series of blog articles will also appear in conjunction. These will then be combined to go on my website's increasingly cool FAQ page.

This month's plane(s) will be Side Rounds.

Essentially all moulding profiles that happen on a straight  piece of wood may be executed using Hollows and rounds. Hollows and rounds, after all, create concave and convex shapes of varying radii and degrees of arc. All mouldings are a series of these varying concave and convex shapes along with some flat segments thrown in for good fun.

If you've read my book or visited my blog then you know that moulding profiles that are to be made with hollows and rounds start with series of rabbets.


The rabbets fall in specific places and serve specific functions. We are not going to get into all of the reasoning and layout of the rabbets with these 'Side Round' posts, but know that one of the purposes of the rabbets is to define transition points: where profiles change from once arc or flat to another.

Take a class with me and you will hear numerous times that rabbets define all transition points. Once that idea has been hammered into the students' heads, we go over the times that rabbets don't define those points, the times when a rabbet cannot. 


There are some transition points that can not be defined with a rabbet or rabbet plane. Some of those points can be defined with a side round.


I will be teaching a class at The Furniture Institute of Massachusetts in a few weeks. The class will certainly cover this subject and many more. Plus, you'll get to execute quick profiles like the one above.


 Stay tuned...

Tuesday, January 9, 2018

Making Moulding Planes With Machines

Seeing multiple methods for executing the same task is often beneficial. 

Old Street Tool has posted several videos of their many plane-making methods on Instagram and others have posted the same. Here is a full video--from set-up to execution--of my method of cutting the escapement of moulding planes on machines, which is different than others.


There are many benefits for making this portion of these planes with machines. Not only is the process incredibly quick (I set the whole thing up and cut two escapements while talking in less than 3 minutes and could likely do 20 of the same size in 5 minutes) but it is also inexpensively made with tools and materials you likely have while being, most importantly, accurate.

Accuracy when cutting the escapement is important because you are also establishing the bed and breast of the mortise. An accurately cut, clean bed will speed up many other aspects of plane making while also leaving a tighter mouth and other cleaner aspects, etc.


I will be teaching a class at The Furniture Institute of Massachusetts from February 10-11. The class is about using moulding planes. Subjects like this video and any other that your little heart desires will be discussed before class, after, during lunch or when you're looking to take a break from making the many moulding we will be learning.


Consider the class if you're considering adding these tools to your work. Spending a weekend with the planes I make will give you a good goal when it comes to tuning your own. I will see you there, or here, or Instagram (@msbickford).