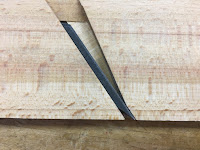
I'm often asked about choosing antique planes. The simplest and shortest advice is to look at the condition of the mouth. A damaged mouth likely means that the plane has a problem other than being in need of a fresh hone. The mouth, whether it is damaged or ill-dimensioned, can and must be fixed. (Knowing why the mouth was damaged and how to fix that is another subject.)
The wear angle of a plane is highlighted here.
The wear angle is nearly parallel to the iron and is an example of a piece of technology in this type of tool. It allows for the plane's sole to be flattened without opening the mouth to any large degree. It also allows a more uniform, tight mouth opening over the width of a wide, deep profile.
There are many things that can be incorrect about this facet. Sometimes the mouth can be damaged in use and the wear angle needs to be reestablished to rid the plane of the damage. If you've made your own planes or they were made by prison labor 100 years ago, then the geometry of the angle may be incorrect before taking the first successful shaving. Any one of these things will render the plane useless because the shaving will clog the mouth at the beginning of every intended pass.
The best tool for removing any wood from the wear angle is a push cheek float.
Be aware that only a few teeth will be engaged with the wear angle. You are likely to get a rippled wear like this one below:
This wavy surface WILL result in a mouth that clogs like this:
The clog above occurred within an inch of starting a cut. If I stop immediately and simply smooth out the the wavy surface then my plane will function appropriately.
I smooth the wear angle with my 150 grit "float."
If I tried to force the shaving to eject then I WILL damage the mouth by forcing a large amount of material into a small area, thus compressing the grain or chipping the mouth. I will then need to open the mouth because it is damaged, not because it is too tight.
Another common mistake is to try to keep the wear angle parallel to the iron. Know that there is no such thing as parallel in woodworking just like there is no such thing as flat, only varying degrees of concavity and convexity. The wear angle is going to progressively open as the shaving travels up through the escapement or it is going to progressively close. The angle must open.
Here is a wear angle that is parallel or slightly closing:
and the resulting shaving and clog:
Follow the process above before you damage the mouth and all will be well again:
Remember that there are several reasons a plane may clog. Addressing the mouth and the wear angle incorrectly will not fix the main problem and only add another.
If you choose to pursue using antique planes then make a few for yourself. The first time you need to fit your wedge into your mortise you will know what a properly fitting wedge shall feel like. The first time you need to bed your iron to your plane body you will know how to bed an iron on an antique, which may be necessary. The first time you need to match your iron's profile to that of the plane, you will work to a new tolerance.
Additionally, the first time you need to address the geometry of the mouth and wear angle then you will know how to fix it.


One of the freshest, most useful blog posts I've read in a long time, anywhere. Thank you for this insight.
ReplyDeleteJim B
Thank you, Jim B.
DeletePlease stay tuned. I am writing an article for on online school and I may have just caught the bug again.
Thanks for this, Matt. Does your book cover this type of thing? Or is it mainly on how to use rabbet and molding planes to create moldings?
ReplyDeleteMy book does not specifically cover subjects like this. In a sentence, the book is about using these planes. As such, I address sharpening and general maintenance in the book, but not rehab.
DeleteMatt,
ReplyDeleteGreat post, and great to meet you last weekend. I have one of those 150 grit floats too. ;)
Such a timely read for me. Great topic and well written. Thanks!
ReplyDeletewood planers are great when I was young. But with the ages of time I started electric planers are working more faster than others. But this one is really great article I think. I have found a helpful article on electric planer: http://besttopreviewsonline.com/blog/10-best-planers/
ReplyDeleteAlso to grating how to
ReplyDeleteuse a hand planer and convenient utility belts which are made to achieve on tempered
steel alongside other colorful compounds, a large number of us supply straight cartridge
rolls for streak evacuation, cleaning and edge breaking. At the indistinguishable time
you'll have the option to find pitch fiber circles with crushing guides for cooler running
which are a magnificent starting point for tempered steel.