Saturday, December 29, 2018

Approaching the Limits of My Pay-Grade: Roman Vs. Grecian Profiles

The pursuit of my woodworking hobby has generally consisted of seeing a piece of furniture and wondering a) if I could build it and b) what it will look like once I do. Basically, my house is filling with self-indulgent endeavors that are totally unrelated to my family's needs (think wife).

These pursuits are actually how I was originally attracted to hollows and rounds. With hollows and rounds I am limited by my skill but not by what bits I have in my drawers or Freud has in their catalogues. (i.e. I've started a new project and the very last thing I'll consider are the intricately specific profiles. I know I can make them, it's just not a concern.)

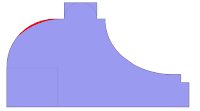
I put up a post on my blog yesterday regarding a custom moulding plane I was commissioned to make. This profile is a "Grecian" profile vs. a "Roman."


 Roman ogee on the Left, Grecian on the Right 


Sometimes I wish I wanted to learn about the reigning empires, major players, and world affecting events of the period that may have led to the evolution that greatly affected my Wednesday of this past week. In fact, maybe the proper thing to do is go read about the subject for a few hours, make broad statements that I cannot cite, and then hope a few specific people won't read my blog. This will then certainly dazzle you with my Wikipedian-like "knowledge," right? Well, I won't.

I'll just quickly make a broad generalization about the the difference between Roman and Grecian profiles that may define a few terms I reference on occasion: Roman profiles are made out of circle segments and Grecian profiles are made out of elliptical segments.

Again, Roman on the Left, Grecian on the Right


Hollows and rounds allow me to copy both. I know I can make the plane I was commissioned to make. Additionally, I can make the profiles I may want to make in the future: circular vs. elliptical, Grecian vs. Roman, and William & Mary vs. Chippendale vs. Becksvoortian (AKA Shaker, AKA no moulding planes).


Note 1: I know and care more than may let on here.

Note 2: Please send a single email to matt@msbickford.com with the subject of "Raffle" to enter to win an 'X-out' 7/8" rabbet plane. I did a contest like this last year. I go out of my way to keep the winner to being a reader. If the contest gets posted on Instagram, Twitter, Tinder, etc. then I'm going to cancel or postpone it. I don't want the publicity, likes or follows. (You don't even have to sign up for my mailing list, nor will you be put on it.) Don't decrease your chances of winning! Like last year, the contest winner will be chosen randomly in an ultra-transparent manner. This won't be me giving the plane to the person with the highest Iprofile. Like last year, I will ship this plane anywhere that USPS will deliver, their rules/relationships not mine. US and Canada? Sure. Germany and Australia? Definitely. The Congo? Probably not, I don't know. But you're probably fine to enter. The specific rules will be defined once the entry period is over. I am the final arbiter. Entries must be made before 23:59 EST on 1/4/19. The plane will work perfectly, I just don't like the piece of wood. If you win and you've already purchased a rabbet plane directly from me then I'll find something else for you.

Thursday, December 27, 2018

Creating Custom Moulding Planes

I constantly disappoint two groups of woodworkers, one of which is the 'hand-tool only' crowd.

Many people assume that I must be part of this wild group due to my making of moulding planes for a living. These crazies (said with affection) are often shocked and disappointed when they find out that I am not entirely one of them. I have a router and I like my router. (Fun Fact 1: my router was the first thing I ordered off of Amazon 15 years ago. I paid $279 + shipping in '03 and I could now get the same kit for $263 with shipping included.) 

If I need to thickness a board less than 12" then I'm headed to my planer 10 out of 10 times. However, with hand planes I can thickness a face that is more than 12" and, on those rare occasions, even more than 30". Bench planes offer me the ability to flatten and thickness any width, not limited by fences, etc. (Fun Fact 2: my planer was part of my second order from Amazon way back then. I paid $449 and the same model is currently $599.) 

(Fun Fact 3: you don't care about my Amazon history, so I'll stop.)

Hand tools afford me this desirable idea of infinity: whether flat surfaces done with planes vs. machines, dovetails done by hand vs. jig,  even the tenons upon a curved surface to adjoin with a crest rail of a Queen Anne chair. 


INFINITY!

Hollows and rounds offer me the same infinite number of possibilities with moulding profiles as many hand tools do with other aspects of this craft. With my selection of hollows and rounds I can essentially make any moulding profile that happens along a straight length. 


On occasion, I am requested to make custom, dedicated planes. In these instances I will need to manufacture 10" of a single profile that will be the sole. I will need to make this short moulding only one time. 


I am still able to make these single planes for nearly the same price because I already have the proper tooling to make an infinite number of profiles: Hollows & Rounds. 

(Metric measurements not included, but I can get close.)

Hollows and rounds fit perfectly into my workshop because I make small amounts of profiles that are determined by you, my customers. In my shop I use hollows and rounds to make the soles of custom planes, remove machine marks from standard planes, and to create the seemingly rare project (see above)

Hollows and rounds will allow you to comfortably make small amounts of highly specific profiles quickly and efficiently, whether it's for 10" of an exacting plane, a piece of reproduction furniture, or something entirely your own.

(The elliptical segments of this plane's sole was executed with four profiled planes #2 Hollow/Round and #3 Hollow/Round, neither of which are recommended for a first-timer)


Talking about (intentionally) softened corners, Chuck Bender wrote a fascinating blog regarding extremely sharp details on his blog the other day. Check it out. 

disclaimer: Chuck is one of the three people responsible for getting me into this professional pursuit. I will be teaching at Chuck's mid-2019. I have a working relationship with him, but not Amazon.


Please send an email to matt@msbickford.com with the subject of "Raffle" to enter to win an X-out 7/8" rabbet plane. I did a contest like this last year. I go out of my way to keep the winner to being a reader. If the contest gets posted on Instagram, Twitter, Tinder, etc. then I'm going to cancel or postpone it. I don't want the publicity, likes or follows. (You don't even have to sign up for my mailing list, nor will you be put on it.) Don't decrease your chances of winning! Like last year, the contest winner will be chosen randomly in an ultra-transparent manner. This won't be me giving the plane to the person with the highest Iprofile. Like last year, I will ship this plane anywhere that USPS will deliver, their rules/relationships not mine. US and Canada? Sure. Germany and Australia? Definitely. The Congo? Probably not, I don't know. But you're probably fine to enter. The specific rules will be defined once the entry period is over. I am the final arbiter. Entries must be made before 23:59 EST on 1/4/19. The plane will work perfectly, I just don't like the piece of wood. If you win and you've already purchased a rabbet plane directly from me then I'll find something else for you.

Tuesday, December 18, 2018

Tuning a Rabbet Plane

All planes eventually go out of flat, both wood and metal.

Metal planes take a long time to distort and also take a long time to fix. Wooden planes go out of flat seasonally and are a one-minute fix.

In this post we will address tuning a wooden rabbet plane.


How do you know when a plane's sole is no longer adequately flat?

The first sign of a plane's sole no longer being flat will proceed in this manner: You set the plane to take a predictable shaving, but it does not. You then blame yourself and your inadequacies, only to set the plane to take a slightly more aggressive shaving. Then the plane only removes wood from the first and last 1/2 inch while still underperforming your expectations. You continue with this process, constantly setting it more aggressively and still being unimpressed with the not performing plane...

Eventually, you again set the plane to take a slightly more aggressive pass and your plane is taking a heavy, aggressive, and uncontrollable shaving throughout.

At this point you know that your expectations were originally correct and your plane's sole needs to be addressed.

How do you address the sole? Do not fear, wooden planes are easy:


Now throw some wax onto the sole and get back to work!

(Anybody that has a boxed rabbet plane shall spin the plane around and start working back to front once taking shavings in front of the mouth, otherwise you will be working against short grain and will chip out the mouth.)

Note: I will be posting instructions to win an 'X-out' plane in the coming day(s)/week(s). I go out of my way to keep the winner as being a current blog reader and 'in-house.' If you've made it this far into the text then I'll encourage you to keep reading my upcoming blogs, knowing that any publicity you give this future contest will ultimately reduce your chances of winning and my desire to pay my readers with these contests.  I am, intentionally, not striving to increase my social media exposure. So, let us keep this quiet, or I will cancel the upcoming contest.


Saturday, December 15, 2018

Making Another Picture Frame with Hollows and Rounds (Actually, Just Hollows Here)

I will choose to keep this post quick because time is precious at this point of each year. Christmas presents must be made, after all. (This frame was made several years ago.)


This frame starts with material that is 1 3/16" wide


Like every profile made with hollows and rounds, we will start with a series of rabbets...


...and chamfers to remove waste and guide the profiled planes.


Step 3: #6 Hollow to make a full 180 degrees of an arc.


Step 5: #4 Hollow


Step 5 and 6: #2 Hollow


Finally, squash the top profile in Step 7: #10 Hollow


Picture frame profiles often look strange to us furniture people, but...


...they always come together once mitered, however.


For the record, I spent 00:20:10 with the profiled planes here, much of which was battling my previous workbench, Big Pink. I had it on videotape but couldn't bring myself to post it.

Note: I will be posting instructions to win an 'X-out' plane in the coming day(s)/week(s). I go out of my way to keep the winner as being a current blog reader, in-house. If you've made it this far into the text then I'll encourage you to keep reading my upcoming blogs, knowing that any publicity you give this future contest will ultimately reduce your chances of winning and my desire to pay my readers.  I am, intentionally, not striving to increase my social media exposure. So, let us keep this quiet, or I will cancel the upcoming contest.

Thursday, November 29, 2018

An Introduction to Ovular and Elliptical Shapes with Hollows and Rounds

(The gist of this post was originally posted in December, 2010. Changes have been made.)

The holidays are coming up. I am (was) conveniently making a few picture frames as gifts. The presents are technically what's inside the frame, but those subjects are not the purpose of these posts.


I am often asked what pair of hollows and rounds a woodworker should start with. The answer, like most things, is that "it depends." I imagine that the 4s, 6s and 8swill have their place in everybody's work (radii of 4/16, 6/16 and 8/16, respectively). This advise, of course, doesn't help somebody that's looking for only one pair.

My recommendation for getting started is as follows: if you want one pair of hollows and rounds then pick an ogee that you like and I'll help you pick a pair to make it. (Fortunately, that same pair will likely fit into your shop well.)

These 30 profiles were all made with the same two planes, a single pair of 6s.

If, however, you have the option, then get two pairs. With a second pair you will be able to make much more than twice as much than what is photographed above. You'll be able to make exponentially more profiles, in fact. You will be able to make all of the same profiles above, but in varying sizes.

These four ogees are geometrically similar: each consists of two circle segments that are 60 degrees of an arc. Each profile is 30 degrees from horizontal. From left to right, they were made with a pair of 10s, 6s, 4s and 2s.

With a second pair, you will also be able to mix and match the hollows of one size with the rounds of your other to make profiles more representative of what you see in period work.

The profile above is 90 degrees of a 1/4" convex radius and 60 degrees of a 3/8" convex.

Additionally, you'll be able to introduce ovular shapes by using two rounds or two hollows together, which is actually the subject of this post.

The large cove of the profile on the left of each of these pictures was made with a single round and is a circle segment. The profile on the right was made with two rounds and is more elliptical. 

It is at this stage, having multiple sizes, that you will truly be able to recognize the versatility that these planes both allow and encourage. Get the 4s and 8s or the 6s and 10s and you'll be able to make scores of complimentary profiles. (Will you want 5s or 16s next? Rest assured that you will know.)

With ovular shapes, all planes are still being guided by the rabbets and chamfers previously touched upon. Steering them is not freehand, but at times it will feel like it is if you do not have a proper strategy.
Take note that the Ovolo on the left and Cove on the right are each made with multiple planes, mimicking an elliptical shape.


Rabbets and chamfers will guide these planes in that same manner we have touched upon before.


Separate the transition points of each plane's future profile with the vertex of a rabbet (Round to hollow, hollow to round, round to round, etc.).


Then create the guide for each round with a rabbet whose vertices approximate the angle of the following cove. (Take note of  the dimensions of the rabbets guiding the rounds in the second picture above.)

#6 round followed by #10 round.

#6 round followed by #10 round


-Or-


Do you see how the rabbets are actually guiding the round?


Chamfer with rabbet plane


#6 hollow followed by #10 hollow


Finally use a rabbet plane for the chamfer followed by #2 hollow.


Look at the result 1-2 passes from completion below.


These picture frame profiles often look a little weird to my eyes (see above). Once they're mitered they are pretty complimentary (see below).


Ovular shapes are seemingly more difficult to lay out at first because it is not always obvious where the necessary guiding rabbets belong. The process is not apparently straight forward. Try a couple picture frames like this and you'll know your error(s) about 20% of the way through. Ultimately, know that you don't need perfect results with either your practice pieces/Christmas presents because you'll be getting socks or Tabasco Sauce in return, which is ideal.


Note: a profile like this is worked from both sides. You'll need straight grain or a scraper.

P.S. It may feel like we're jumping all over the place. By seeing more complex profiles you'll start to piece the generic process together on your own. We'll get to the basics in the coming weeks and the basic process will then be evident.

Just think about the following: How do the rabbets act as depth gauges? How do the planes, themselves, act as depth gauges?

Tuesday, November 20, 2018

A Fresh Start with Hollows and Rounds

Hollows and rounds are seemingly difficult to steer, especially if you have the wrong strategy. If a profiled plane has a single point for its contoured sole to ride, the chance that you end up with the beginning of 7' molding equaling the end is slim. The chance of the beginning equaling the ending and equaling what you want? Good Luck!


Hollows and rounds shall be steered by giving each plane two points to ride upon, instead of just one.

Let the rabbets and chamfers dictate the direction that the planes are presented.


Changing the dimensions of the guiding principal, a rabbet for a round and a chamfer for the hollow, shall change the final product.

*Take note that the rounds are guided by the two tips of a rabbet. The hollows are guided by the two edges of a chamfer. 

Let's look at some real-life examples now.

Do you want an ovolo at 30 degrees? One hollow? One chamfer at 30 degrees.

(Note: the vertical and horizontal fillets are defined by rabbets)

Do you want a cove at 30 degrees? one round? The arrises of the guiding rabbet shall be at 30 degrees.

An ogee at 30 degrees? one hollow and one round--one 30-degree chamfered rabbet for the hollow, the arrises of a single rabbet for the round, also at 30 degrees.


An ogee at 45 degrees? Look at the differences in the rabbets below vs. above. Everything is laid out at 45 degrees here.

A reverse ogee at 30 degrees? Again, look at the different layout. Same tools, similar rabbets, different results.

Do you see any features above that you recognize from the previous two moldings (reverse ogee and astragal, cove and ovolo) at which we looked?

Additionally, look at how much material is being removed by the profiled planes in the perfect world of Google’s Sketch-Up. It's minimal.

Next week we'll specifically look at how rabbets serve as a depth gauge.

One last thing: I am not the person to speak to regarding design. I am a copycat when it comes to my craft. This is the reason I bought my first antique planes--to copy. Anybody looking for elements regarding design should check out Lie-Nielsen's library. I've heard very good things about a few of their dvds, including those by Don McConnell, Larry Williams and George Walker. They are each extraordinarily knowledgeable in the subject.