
How many passes do you take with a smooth plane before you need to address the edge? 100? 200? I have no idea, but it's a lot. The point is that the profiled planes do not require maintenance nearly as often as, say, your smooth plane. You're just not taking that many passes with them. Let the rabbet plane do the work.
Look at the actual material that profiled planes are removing in this ogee.


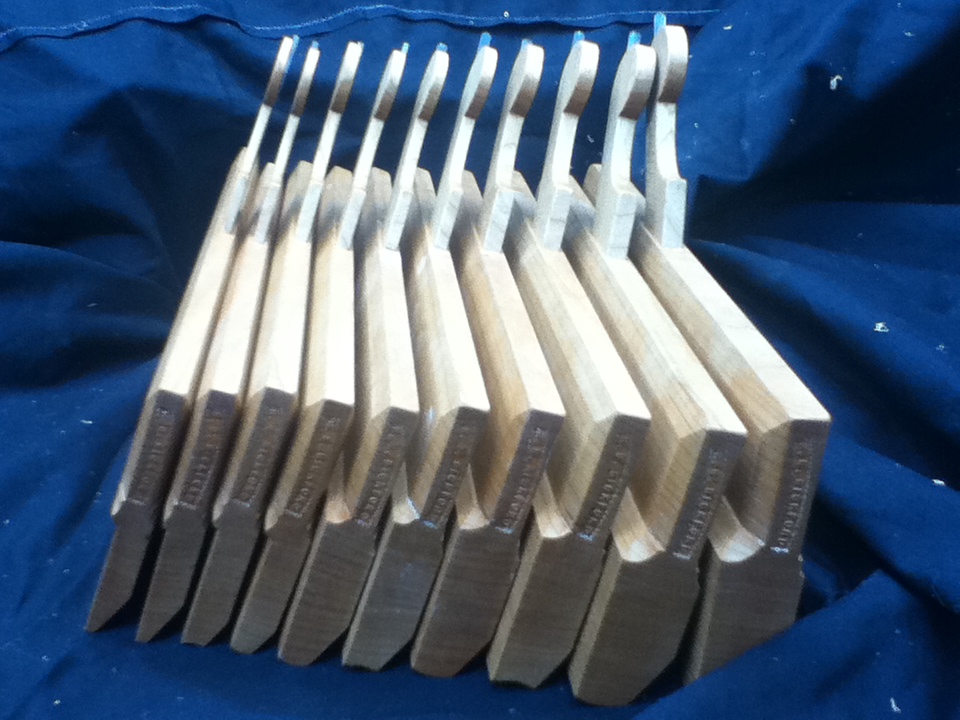
Step 1 and 2 are executed with a rabbet plane which has a straight iron.


In the perfect world of google sketch up you will take 3-5 passes with the hollow in step 3. Ideally, you will knock some of those corners in step 4 off with a rabbet and you will also take 3-5 passes with the round. You should be taking as few passes as possible.
*Note: I will link to a few products below. I'm not going to get in an oil stone vs. water stone vs. sandpaper argument. I imagine they all work well. I use oil stones. I've never used any other methods. I'm happy here. You be happy there. Additionally, I'm not endorsing products. I'm pointing you to examples of which I will be talking. I cannot speak to various grits. I just don't know. The links are simply representative of what I have.
Let us not make light of the sharpening subject by stating that you don't take many passes with them. The quality of edge and the profile of the edge vs. the profile of the sole are CRUCIAL to performance and should not be overlooked or understated. In fact, if your plane is clogging and your wood is oriented properly, these two factors should be looked at first.
**Note: First things first. If you ever lack the confidence to sharpen a profiled molding plane iron get a mid-swept, mid-width carving gouge. Learn all of the skills below on a carving gouge before a plane iron. There is significant room for error with a gouge when compared to a plane iron, which is nil. You will learn to rock the gouge across the stone. You will learn to use slip stones inside of the gouge's canal. You will learn how wonderful a strop is. The movements are not exactly the same, but if you can sharpen a gouge you can sharpen one of these. It may take you a long time, but you can do it. (And, as a bonus, once you can sharpen a molding plane iron efficiently you will be incredible at sharpening carving gouges.)
Here we go...
Probably four out of five times that I need to address the edge (really any edge) I bring it to a leather strop (or piece of flattened maple for the iron's back) charged with green honing compound. If you attempt to hold the iron at the proper angle you won't mess anything up at this stage. Just don't hold the iron at 90 degrees and scrape the strop. I pinch the strop for the hollow and lay it flat on my bench for a round. Get both sides and get back to work.
On the fifth time you will need to go to a fine, unaggressive stone. Both sides of a round's iron are done on a flat stone. You will need some sort of slip stone for the bevel of the hollow. I imagine you can also use sandpaper on a dowel. I even saw water slip stones in a recent catalogue for the first time.
People use slip stones differently. Some move the iron while holding the stone still. I move the stone while holding the hollow's iron steady. Start at an angle you think is slightly too shallow and take several passes. Look at the edge. You can see if you dulled the finish from the strop at the bevel's edge or at the heal of the bevel. Slowly steepen the angle at which you're holding the stone until you're touching the bevel's edge. Take five to ten long sweeping motions. Do not take 50 short staggered, abrupt sawing motions because this WILL cause problems as you develop gutters (?) that the slip stone will rest in. Flatten the back on your unaggressive stone, repeat and strop.
If you're holding the stone at the proper angle and intentionally addressing the entire edge, the few passes that you take with this unaggressive slip should not affect the iron's profile while still establishing a new edge.
A round will follow the same idea. Take long sweeping passes while intentionally holding the iron at the proper angle and addressing the entire edge. Flatten the back, repeat and strop. Do not lean heavily upon the iron.
By the time you need to go to a more aggressive flat stone and slip stone where you can quickly and drastically affect the profile, you will have executed the above, unaggressive step several times with that iron and with others. You will have the skill down. If you don't, PLEASE practice on a carving gouge.
What you see above is pretty much all I use other than a diamond stone to start off. When I started carving and using molding planes I also used one of these conical stones. The more I sharpen, the less I use this stone. I really only use it now to dig myself out of deep holes, usually 30 minutes after I should have grabbed it.
I know what you are thinking... What is Matt talking about? We need Google Sketch-ups!
Well, I have a treat for you. I had grand ideas of posting 10 small videos showing all these different steps up close. But I have bills to pay and chose not to afford you the time. I think I have something better.
A lot of times I've seen videos and they show an hours work condensed into minutes. A bombe chest in a series of short web episodes...A router table in one PBS time slot...A pair of hollows and rounds in 2 hours... a 3 minute dovetail? I saw Chuck Bender of Acanthus Workshop (this is a plug) nearly do one in person, but I still think it was condensed.
I let the camera roll in my shop today. I started with the iron directly off the grinder and out of heat treating. I'm starting at square one flattening the back and finishing with the end product. There's no verbal instruction and no camera girl getting the perfect angle. I'd probably prefer that you don't take your time to watch them completely because I may find it a little weird. You can zip through them as you please, but everything, in its entirety, is in here.
I'm working with a #8 round here. You will see me rocking the iron across the various stones. About the time when I move the camera I switch from the course india to the fine arkansas. I make the switch once the profile is very close. You will also see my shop friend and middle son, Thaddeus.
Here I'm working with with a #6 hollow. You'll see how I hold the slips.
A few final thoughts: You can see any areas that need to be readdressed by the uniformity of the shaving's thickness. It's pretty obvious, especially when it's not cutting in a certain place. 5-10 minutes spent at the grinder and with files before heat treating can save significant time on the stones. It will change 90 minutes of frustration into the 15 you see above
If you want more detailed footage I'll recommend that you get Larry Williams DVD. I've never seen it but I imagine it's very good and detailed. I hope somebody will chime in and give it a first person endorsement in the comment section.
I may have missed something. Ask questions.
Also, I will be at the Lie Nielsen event in Brooklyn this weekend. I will have a starter set that gets mailed on Monday with me. Come check out what I deliver, if only to compare them to your antique gems. I will also, as usual, have one of everything represented on my website set up for you or me to use. Bring questions, bring requests.

Hi Matt,
ReplyDeleteMore excellent knowledge shared here - thanks.
I have questions.
How do you layout the original profile on the blank prior to grinding.
Further, I have some antique planes where the profile of the iron clearly doesn't match the profile of the sole; what do you think of the technique of transferring the sole profile to the iron using layout fluid and a scratch awl? would I be better grinding off the profile entirely and starting again?
Hope that makes sense.
HNY
simonm
Simon,
ReplyDeleteI lay out the original profile on the blank prior to grinding with layout fluid and an unbeveled instrument, not a scratch awl.
I'd recommend grinding off as little of the profile as necessary. Larry Williams discusses heat treating a new iron and, I think, annealing an old one in his DVDs. If your profile is drastically incorrect you should probably use one of these two methods.
Heat treating may be intimidating but Larry shows a very comprehensive and accurate way that it can be executed for $20 + plus the cost of the dvd if you have none of the equipment. You probably have it all.
Matt
Hi Matt,
ReplyDeleteGreat post. I really enjoy reading your blog, keep up the good work. Also, looking forward to the LN event this weekend in Brooklyn- See you in Bushwick!
Cheers,
Niels
Thanks, Niels.
ReplyDeleteI will see you there!
Matt - your blog is awesome. It's totally de-mystifying the use of these planes and making me wish I had some already to try this stuff out as you demonstrate it. That being said, I don't see the excitement fading any time soon. I wish you were coming to our LN show down here in Texas this weekend instead of NY, but I guess it's probably much easier to travel out there over those short east coast distances:)
ReplyDeleteSo I've got another random, unrelated question and no place to put it other than in a comment on your latest post - hope that's allright.
My question is about plane handedness. I'm left handed. I do some things with my right hand, but planing has definitely been an exclusively left-handed endeavor. The only plane I have that forces me to use it right handed is my #45, and I've found that it's manageable for me mostly because of the fence. So my question is, would you advise a lefty to force him or herself to learn to use molding planes right handed even though it will be more difficult for us, or would you advise them to go ahead and make them -or have them made- left-handed? Do you make left handed planes, or just the right handed ones? Also, are rabbet planes handed by virtue of an escapement bevel? Larry doesn't cover those in his video, but from what I can tell of pictures of them it looks like they're designed to deflect the shaving out a particular side.
Lastly, if there's a better way to submit questions than posting them in the comments section, please let me know!
Thanks as always.
Reed
Matt,
ReplyDeleteThanks for another great blog. I bought the Sharpening profiled tools DVD more than a year ago but just watched it in the last week. I havent finished it all yet but it was worth every penny for me. The key steps
1) make sure that the plane is true (not warped) adjust and fettle it if it is.
2) Mark the iron with Layout dye (machinist layout dye)
3) install the iron and then scribe the profile on the iron (be sure that the mark is true to the sole and edge, Larry used a home made scribe to ensure there was no error from a round scribe)
4) grind rounds on a grinder
5) grind hollows with a foredom tool with cones
He uses slips for sharpening after grinding
He does touch on annealing and tempering old blades
Do you use layout dye?
Chris K.
Reed,
ReplyDeletePlease see my post on 1/5. I can't imagine having to use left handed planes. I'm certain with enough practice you could work it out. It would be difficult for me. I've made left handed rabbets too. I think I recently saw one for sale at www.thebestthings.com.
Matt
Chris,
ReplyDeleteI grind hollows with a 7" dia, 1/8" width cutoff wheel on my bench grinder. STAY AWAY FROM THE EDGE! you will butcher it if you get too close. I can get as close as maybe 1/32".
The wheels come square. Don't try to touch up the profile of a 1/4" dia hollow right out of the box. The corners of the wheel will soon get knocked off and you'll be able to do smaller profiles.
I use this cut off wheel for 90% of the grinding I do. It's very aggressive.
Most of my grinding is done with unhardened steel. I just, however, decreased the bevel angle of one of my bench chisels (1 1/4") and only used this 1/8" wheel. My flat stones quickly take out any minor imperfections.
Matt
@Matt
ReplyDeleteThanks for the feedback
@Chris K
Just ordered the DVD - two recommendations in the same thread!
I just received two new (to me) straight rebate planes made by Varvill & Sons. As you say they are way faster\better for laying out the guide rebates than either a shoulder plane or the Record #778 I was using previously.
I'm still finding it hard to keep the first\last couple of inches of my mouldings consistent, a lot of other commentators suggest just trimming these off - do you do this?
simonm
Matt,
ReplyDeleteInteresting that you use the grinder and the 1/8" wheel. I would think that you would have more control with a grinder than two handed operation with a foredom tool in one and the blade in the other.
So you say you get to 3/32 of the profile mark and then take out the lst 3/32 with slips?
Enjoyed seeing your son's cameo in the video
Chris K.
Hi Matt!
ReplyDeleteI have a question about the slips. Do You use one size of slip for every size of hollows or do You have various sizes?
Regards,
Lukasz Budzynski.
I linked to the various stones that I use in this blog post.
ReplyDeleteI have two different grits, of course: India and arkansas. I have two india slips, one of which is the conical stone linked above.
I have 4 arkansas slips with 8 sides, of which I use 3 sides. One of which is a small radius of approximately 1/16", a larger radius of maybe 1/8" and one that is a knife edge.
In short, I do not have various stones for various radius. I get it close with the conical india stone for the larger hollows. I rid it of high spots with the small india slip. I put the final edge on with the arkansas, that is always a much tighter radius than the plane.
Once the edge is correct, I rarely go back to that original india stone. Seasonal adjustments are usually made with only the arkansas slips.