Friday, December 15, 2017

A Justification for Hollows and Rounds

Note 1: This article will be a further addition to my increasing FAQ page. Check it out.

Note 2: My wife, friends and editors always tell me that all of my introductions are too long. Deal with them or delete them. I consider them desirable.

Please consider these paragraphs an introduction to reasons these tools--hand tools--may find relevance in your shop.

(This picture only serves as click bait.)


The first financial commitment of my path into woodworking was the purchase of a table saw. With slightly more woodworking experience, I quickly acquired a 6” jointer and less expensive 12” lunchbox planer. With more practice and increasingly wild dreams I accepted that the combination of my jointer and planer was not able to prepare the desired dimensioned wood of my future.

I priced the various options for jointers and planers. I could purchase a 12” jointer for $2,000 or more (up from only several hundred,) but then I’d have +5x the price invested into my jointer over my planer. At that point, I might as well put another $1,500-$2,000 into a 16” planer. This inevitability, of course, would only leave me wanting a wider jointer, then wider planer, and then jointer, and so on. I was left going through the back and forth, chasing the “Jointer High.”

Do you recognize this?

The “Jointer High,” as I’ve termed the above, is the idea that if you buy the largest sized jointer you choose to afford then you feel that you owe yourself a similarly expensive planer, which will be much wider. Then you consider spending more on a jointer and more on a planer and the circle continues. Buy the widest of both of these and you still won’t have the ability to flatten the top of a 34” wide piece for a single board, pie-crust table.


At this point you do more research and you think that you will just build a router jig for that pie-crust table you’re considering only to recognize that you will not be able to flatten the bench top you intend to build with the jig you propose to construct. You then consider buying a wide belt sander or CNC machine because you’ll have to store the longer/wider router jig and you…

Stop. You’re frustrated…

There are two groups of woodworkers that I tend to disappoint. One of them is the hand tool-only crowd. These quickly disheartened craftsmen assume that I only use hand tools because I spend all day making them. I, however, am a hybrid woodworker. I use hand tools when I am able to accomplish my goal more completely, or more quickly, or without the inherent limitations, which there always are with machines.

These previous pitfalls may be avoided. Introduce a functioning fore plane and try plane into your craft and you may likely content yourself with that 4” Rockwell jointer you’ve seen on craigslist versus the 12” model you’ve considered coupled with your dreamed 24” planer. You need not ever be limited by your tooling if you’ve chosen the correct supplemental tools to your chosen machinery. Hand tools often provide the idea of infinity that all machinery cannot.

Your ability to use hollows and rounds in your work will introduce the same idea of creativity that using a fore or try plane did: exactly create what you want by crafting. Learn to use these bench planes to supplement your machinery then you won’t let your current mechanical tooling affect your actual choices.

Hollows and rounds offer the same idea and pursuit to all: infinite options. Know that committing to hollows and rounds does not commit you to making hundreds of feet of a profile for new crown moulding in your living room and garage. Hollows and rounds offer you the ability to create your thoughts or reproduce a previous maker’s conclusion, not some manufacturer’s interpretations of either.

 These manufacturers’ adoptions, history’s concusions, or your moulding profiles are all made up of the same concave, convex and flat surfaces. Hollows and rounds offer the ability to make these varying convex and concave surfaces. Hollows and rounds will introduce you to the idea of infinity in the same way that the fore plane, try plane, and jointer planes will allow you to flatten any surface, regardless of length, width or (we have not yet addressed this) grain reversal.

The ability to create flat surfaces with hand tools offers you the ability to make any surface flat in the same way that a hand saw allows you to make dovetails of any depth, width, angle or spacing. Hollows and rounds similarly offer you infinite edges and moulded decoration.

The choices that hand tools offer may seemingly be neither apparent, necessary nor desirable in every shop. A varying degree of hand tools have their place, however, in every shop. Consider the options.

How do hand tools fit into your shop?

Do you like this presented idea of ‘infinity’. Of course, maybe you just like listening to baseball or music more than the screeching whine of a router along with your dust collector which does not collect all of the dust. Or maybe you like not having the physical threat that your machines create while spinning at 15,000 rpm. Heck, maybe you just want moulded surfaces that remain clean and sharp because they do not need to be sanded with 3 different grits of sandpaper.

(Dedicated plane for a harpsichord's bridge. The routed profile above will not be the same after machine marks are removed.)


Saturday, December 9, 2017

And the Winner of the 3/16" Side Bead Is....


Let's get a closer look...

Double checking...

UPSET!!!!!!

was***wr@gmail.com!!!!!!!

Email coming...


Registration To Win A 3/16" Side Bead Plane...

Registration to win a 3/16" side bead plane IS CLOSED. A winner will be chosen at random later this afternoon.


Every entrant has been assigned a number based on the order in which he/she responded. Check the alphabetical list below for your email followed by your assigned number.


Each number has been assigned a spot on the board. A spot on the board will be chosen at random using 'The RANDOMIZER' method.

The winner will be the person who has the most shot through their circle. Any hole barely touching the circle is equal to a shot in the dead center. In the event of a tie the winner will be decided by The Randomizer tomorrow or Monday following the same method, bigger circles. I am the judge and the final arbiter.

Video and a final picture will be posted here and on Instagram: @msbickford

One of my kids will be taking the shot, so complain to him and not me.

(I do have a class for the fire department I volunteer at all day today, so the contest will happen later on. Weather may push it back until tomorrow, but I doubt it.)

If you have any questions please feel free to send them. Please do keep them limited for now.

Good Luck!


Tuesday, December 5, 2017

Fences, Depth Stops, Moving Fillister Planes, Etc.

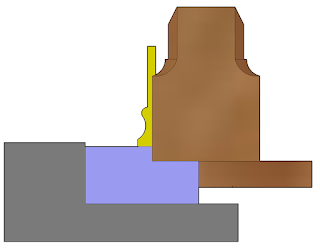
A dedicated moulding plane makes a single moulding profile. These planes will make one profile at one angle, one location, and one orientation. Dedicated planes will have a fence and a depth stop. These two features make the plane apparently simple to use. The fence and depth stop also limit the plane by mandating the need of reference surfaces for each.

Hollows and rounds are versatile because they lack fences and depth stops. Hollows and rounds are attractive to woodworkers because they offer something which machinery can not: the idea of infinity. This idea of infinite possibilities is achievable due to the lack of an integral fence and depth stop. 

The benefits in using a rabbet plane are similar to those of hollows and rounds: the lack of a fence and depth stop is advantageous because the lack of these two features means that there is no reliance upon either.


When making a single rabbet upon a corner of a board with a moving fillister or any fenced plane, both fence and depth stops may have predictable surfaces upon which to register...

or they may not. Depending upon dimensions, the face and the edge are not always accessible.


In these cases will you let the fence register against your sticking board? There may not be a better option.


When making two rabbets, as you will with most minimal moulding profiles, the reference surfaces for the fence and depth stop can become less clear and predictable: face and edge or face and previous rabbet? Just hope the rabbet doesn't change dimension throughout the length because your stops depend upon uniformity.

Making three rabbets generally confiscates at least one of those reference surfaces from the plane.

What happens when you need to make ten rabbets next to each other for a slightly complicated moulding and you rely upon a fence or depth stop? 


Or, what if your fence does not extend wide enough or your depth stop not adequately deep?

These last example aren't good examples because you should be working on an angled surface here. So what do you do when working on an angled surface with a fenced plane?

I don't know what to do in these instances because I don't face such problems. I use a rabbet plane.


A rabbet plane is highly versatile tool that relies only upon the user. If you fight the plane to make accurate rabbets then you have a rabbet plane that is not accurately tuned and ought to be fought. Your issue is with the tool that you have and is not with the tool in principle.

There are, of course, many methods for making rabbets by hand. A block rabbet plane, jack rabbet plane, bench rabbet plane, shoulder plane, Stanley rebate plane, moving fillester plane, Combination plane and etc., etc., etc., can all be successfully used to execute our subject. If in use, however, you ever find yourself thinking "This is a tedious method to produce one rabbet" or "this is insane, there ought be a better way" then your conclusion shall be that it's tediously insane with the tools you've been sold. The conclusion shall not be that it is tedious to produce by hand. You simply have the wrong tool.

In short, if you're looking to add a single relief for drawer faces or window sash then, sure, go with any one of a number of fenced planes. Uniformity is ideal in these situations and your husband will be impressed with your gadgetry. Other than a rabbet plane,I can not recommend one option specifically for any task warranting this uniformity because I'd use a table saw 10 out of 10 times on these occasions. 

Mouldings, however? Get a proper rabbet plane now or a rabbet plane after being discouraged by other options. Either way, you're getting a rabbet plane.

(I've illustrated a moving fillister making rabbets above, any fenced plane will face similar problems once producing inside of the absolute edge.)

Note: Do you want to win a free 3/16" side bead plane? I am trying to gauge how many people actually read these posts. Please send one email to matt@msbickford.com with the subject "Raffle" to be eligible. The raffle ends at midnight on 12/8, EST. The winner will be picked at random on Saturday, 12/9.

I ask that you please keep this raffle quiet. Telling other people about this contest will reduce the chances of you winning and me sending the tool to somebody that actually wants it. I'm not trying to increase my readership here, just rewarding one of those that does. PLEASE DO NOT PUBLISH THIS! PLEASE DO NOT ENTER MULTIPLE TIMES USING VARIOUS email addresses.

If I see reference to this raffle on the internet then I reserve the right to disqualify the person who posted it. Again, I'm not interested in increasing my numbers of followers with this so please do not use it to increase your 'likes'. I'm only interested in rewarding one of the readers who have made it this far.

The one winner will receive an x-out 3/16" side bead plane delivered anywhere that the USPS will take it . The plane will be shipped as "used", but any international winner will be responsible for their assumed taxes. (The plane is of the same standard as any other plane I sell, I just don't like the look of the wood.)

Finally, I will not be searching the surface of this wonderful world to contact the winner. I will allude to the winner's handle in the comment section and on Instagram when the raffle is expired. An email will be sent. It's up to you to respond to me. 

Seriously, let's just have fun among those of us that are seemingly interested in moving fillisters to varying degrees. Please don't tell anybody about it.

Tuesday, November 28, 2017

How To Laterally Set A Moulding Plane's Iron

Continuing to add to the FAQ page on my website. Check it out or make suggestions in the various comment sections here.

Some planes have mechanical adjusters to help with the alignment of a blade in the plane's body. Some planes have none and rely upon slight taps with a hammer. Laterally adjusting an iron can be a tricky task for the newly initiated. Efficiency with this skill is acquired only with time and attempts.

Becoming proficient with setting one plane certainly helps with the process needed for others. Once you become adept at setting the iron for a plane with no adjustment mechanism, for example, you will likely include slight taps of a hammer with those that do. No two planes, however, are exactly the same to set and adjust: some planes have more play in their adjusters while others have no adjuster and a wedge that braces the iron more or less firmly than the average.


Every time, with every plane, the depth of cut must be addressed each time the plane is disassembled for sharpening. Additionally, each time you take the iron out of any plane you must laterally adjust the plane's iron to be in line with the plane's sole, right?

No, actually. I sharpen the profile of my side escapement irons so that there is no lateral adjustment necessary, only depth of cut. How is this possible? I grind my irons so that when the plane's iron is pressed firmly against the blind side of the plane's body (the side of the plane that the shaving is not ejected from) the iron's profile is directly in line with the profile of the plane's body.


When I set the iron for my #18 I just push the iron firmly against the left side of plane body with my fore finger. Everything falls right in line.


The same principle applies to setting up my 10s: push the iron firmly against the blind side.


The 2s? Same thing.


Even left handed planes or, in this case, a snipes bill plane sets up with the same process.


My purpose of spending the time to profile the planes in this manner may not be apparent if you only have one or two planes that you use. After all, you will only need to remember that plane A's iron is centered at the top while touching the blind side at the bottom while Plane B's iron is very different and if you get it wrong you'll figure it out.

When you have several planes, however, your opinion will change. It is nice knowing that every single plane in this picture is laterally set in the exact same manner: You just push it against that blind side and everything is in line.


There is no fuss in aligning the two profiles here, there, or anywhere.


Keeping the plane this way, of course, is up to the user.


My rabbet planes, despite having square soles with square irons, are slightly more tedious to set up than any other planes that I make. They are the only planes that have the iron floating in or near the center of the mortise.


Though every plane you will own from various manufacturers has it's own feel, I go out of my way to make certain that each plane works in the same manner as its mate and every other plane in its set. The irons all set the exact same way.

Finally, due to the graduating widths of the irons; the mortise, wedge and tang increase in size similarly. This ensures that the same strike of an adjusting hammer will advance the iron a similar amount, regardless of the plane's size.

I dare say that these planes are easier to set up than most.

Monday, November 20, 2017

Left Handed Moulding Planes

Notes: I have never had a left-handed student choose to use right-handed planes. I have never had right-handed students choose to use left-handed planes, unless posing for a joke.

I am teaching a class at CVSW this weekend. There are two spots open. Come learn how to use hollows and rounds, left or right. Come learn what appropriately tuned planes feel like, left and right. Come listen to Bob Van Dyke chastise me for listening to the soundtrack to "Hamilton", neither left nor right.

I continue to add pages to my FAQ page, this is one.

Finding the perfect plane for you lefties may be difficult, regardless of where you fall on the political spectrum.

(1) You will want a specific ogee so you watch the various antique dealers hoping they will post it and you will be the first to buy it…now. It is possible. It is unlikely. You will think that "there should be a law."
(2) You want a missing pair of hollows and rounds to match your set so you watch eBay. With enough time, your desired pair will likely show up. Best case scenario you will get into a bidding war, you buy it, it is not exact, you sell it on eBay to your bidding partner at 40%. You will think that "there should be a law."
(3) You want any left handed plane. You wait, wait, read, and wait. It is not going to happen so you wish for a law to fix the left vs. right conundrum and realize there once was an unwritten law to fix exactly this.

Left handed antique planes essentially do not exist. Left handed planes are desirable for those that can not conform and may only exist because a few have not conformed.
I had a long series of paragraphs, pictures and illustrations typed out to explain the advantages of having the correctly handed planes. Having done that and now erased it, I think I can make this subject quick and apparent. You need to be able to see your progress, as measured by the shavings your plane is producing.

This is a right handed person using a right handed plane. He is working in the normal direction, right to left. Do you see how he is able see inside of the escapement?

This is a right handed person pretending to be left handed while using a left handed plane. He is working in a left handed person’s normal direction, left to right. He can also see inside of the escapement. While taking this photo he said “How do I place my hands? Wait, hold on, this? This feels weird, ok.”

This is a right handed person pretending to be left handed while using a right handed plane going in the left handed direction. While taking the picture he stated “I don’t know what I’m supposed to see. Are there two shavings? Why are you taking this picture?”

When using hollows and rounds we want predictable, desirable results. To get these results we need to be able to gauge our progress. We are able to measure our progress by watching the shavings being ejected from the mouth. If you cannot see the shavings then you cannot see the results. Additionally, if you cannot manipulate the plane to change the shavings because you cannot see the shavings or you’re not steering with your dominate hand then you will not get predictable results.

If you are told that you need to learn to deal with the situation because you don’t know what is best for you then you are dealing with somebody with an 18th-century mentality or somebody that doesn’t want to change the tooling in their shop to fit your desires, which is the exact opposite reason you’re purchasing new hollows and rounds. If you want new left handed planes and are told that you don't know what is best for you, just assume the person making the statement wants to slap your wrists with a ruler. (Note: stating there aren't enough lefties to pay for the tooling is different than stating you are wrong.)

Left handed planes are best for left handed people, as evidenced by every single left handed student I have had and given the choice. You may not choose to purchase all of your planes new and left handed. However, if you are left handed and you own some lefties while still owning some righties, the new lefties won’t make you worse with your old righties. You will be better overall.
This page is dedicated to my mother, the lefty, and Roger, the insistent: