You know you're doing it.
Happy Thanksgiving!

Thursday, November 24, 2011
Wednesday, November 23, 2011
The Result
I have finished sharpening the dedicated plane I made yesterday. Here's a quick image of the result.

Three quick points:
1. A custom router bit is cheaper.
2. Setting this profile onto an edge, however, will always be a 5 minute operation from start to finish. Compare that to the time it will take you to set up a router table and then sand.
3. The making of this plane speaks well to the versatility of hollows and rounds. The sole of the plane was made with them. The profile itself can be made with them. There are scores of additional profiles you can create with just them and an incalculable amount that they could be incorporated into.
Tuesday, November 22, 2011
Dedicated Plane for a Harpsichord Bridge
It has been a while since I posted a step by step. I thought you might be interested in this one because it's a little different.
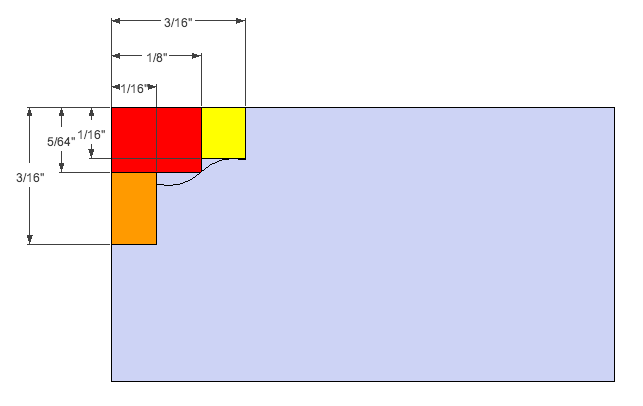
I'm in the process of making a dedicated plane for Owen Daly, a professional harpsichord maker. The profile is for the bridge.
The dimensions here are approximate and for the actual moulding, not the plane.


I'm in the process of making a dedicated plane for Owen Daly, a professional harpsichord maker. The profile is for the bridge.
The dimensions here are approximate and for the actual moulding, not the plane.
Rabbet plane

1 pass with a snipes bill

Rabbet plane for the chamfer followed by #1 round. (Take note that I am using the plane on a chamfer, not as I traditionally do on the arrises of a rabbet. It's just too small.)

#1 hollow. (Again, because the plane is so small I am simply starting on a single corner.)

Complete
Waiting for approval before I go ahead with the grinding, etc...

The actual profile is off his router table. The plane is my work.
Subscribe to:
Posts (Atom)